Setup Tab: Difference between revisions
| Line 29: | Line 29: | ||
Set all channels to: This is a shortcut to turn all channels off, or to Voltage or IEPE measurements. Some of these buttons may be disabled. For example the Virtins DAQ can only measure in IEPE mode, not voltage. | Set all channels to: This is a shortcut to turn all channels off, or to Voltage or IEPE measurements. Some of these buttons may be disabled. For example the Virtins DAQ can only measure in IEPE mode, not voltage. | ||
Refresh Data Acquisition Hardware List: Use this button if you plug in the hardware after starting the software, add or remove an NI module to the carrier, for troubleshooting hardware connectivity, and also as a general reset button. For example, pressing this button in analysis mode cancels analysis and returns you to wait mode. See [[User Interface]] for an explanation of different modes. | Refresh Data Acquisition Hardware List: Use this button if you plug in the hardware after starting the software, add or remove an NI module to the carrier, for troubleshooting hardware connectivity, and also as a general reset button. For example, pressing this button in analysis mode cancels analysis and returns you to wait mode. See [[User Interface]] for an explanation of different modes. This button may also fix any apparent bugs with the display graphics. | ||
DAQ list radio buttons: All recognised hardware will be listed here. See the [https://www.industrialvibes.com Home Page] for the latest list of recognised hardware. Note that an NI carrier requires a recognised module before it is added to the list. Only one device can be selected. | DAQ list radio buttons: All recognised hardware will be listed here. See the [https://www.industrialvibes.com Home Page] for the latest list of recognised hardware. Note that an NI carrier requires a recognised module before it is added to the list. Only one device can be selected. | ||
Revision as of 02:04, 3 June 2024
The Data Acquisition and Channel Setup tab (the "Setup" tab) is the first/leftmost tab at the top of the screen. It is where you change all the hardware-related settings. These are the settings that cannot be changed once you have started logging, or during analysis. Some of these settings are channel-dependent. For convenience (because this is the only table of settings with one row per channel), the channel-dependent plot settings are also included here. These plot settings can be changed during logging or post-processing. They are an array of check boxes to turn plotting on and off for each channel. The Setup tab is divided into 3 sections:
Main Settings
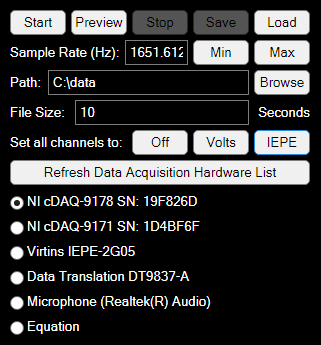
Start: acquire data, log to disk, and plot as requested. Each time you start logging, a new folder is created, containing one setup file and multiple data files.
Preview: acquire data and plot as requested, but do not log to disk. We advise against using this option for investigative work, unless you have disk space limitations (which is unlikely). It is easier to ignore unused data than make up for missing data. There is a risk of an important 'one-off' event happening that you cannot reproduce, or for which there are clues in the measured data on how to reproduce. For similar reasons Expert does not currently offer any kind of 'triggered' measurements. These require additional effort to set up and create the risk of missing important data, for little benefit.
Stop: stop acquiring data
Save: not currently used, but will be plugged in in future releases to save updated plot settings during logging and analysis.
Load: load logged data. We recommend selecting a folder. Selecting a setup file will achieve the same thing. You can also select a subset of the measured data files within the folder.
Sample Rate (Hz): Sample rate in Hz. If you have received VCAT training and are primarily familiar with route-based data logging, this approach to setting up the logger may be unfamiliar to you. See Sample Rate for more information.
Path: Where the data is stored. See Installation for information on the default path and how to change it.
File Size: File size in seconds.
Set all channels to: This is a shortcut to turn all channels off, or to Voltage or IEPE measurements. Some of these buttons may be disabled. For example the Virtins DAQ can only measure in IEPE mode, not voltage.
Refresh Data Acquisition Hardware List: Use this button if you plug in the hardware after starting the software, add or remove an NI module to the carrier, for troubleshooting hardware connectivity, and also as a general reset button. For example, pressing this button in analysis mode cancels analysis and returns you to wait mode. See User Interface for an explanation of different modes. This button may also fix any apparent bugs with the display graphics.
DAQ list radio buttons: All recognised hardware will be listed here. See the Home Page for the latest list of recognised hardware. Note that an NI carrier requires a recognised module before it is added to the list. Only one device can be selected.